CardioSoft CAM Connect 14 (CC14) with Integration Installation Guide
This guide will show you how to install and configure the Intelligent Integration Interface for the CardioSoft CAM-USB and CAM Connect 14 ECG machines. If you need the license keys and SWOPT files please request them by going to Numed Installation Guides and Request Licenses. You can download a PDF copy of this guide at the bottom of the page.

For the ECG machine to work correctly all steps in this guide need to be followed.
Installation of the Intelligent Integration Interface (I3)
1.
Download
and extract https://downloads.numed.co.uk/software/i3/I3installer.zip
2.
Run
I3installer.msi then click Next
3.
Click
Install
4.
Click
Finish
Installation of CardioSoft
5.
Download and extract https://downloads.numed.co.uk/software/ge/Cardiosoft.zip then run setup.exe
6.
Click
Next
7.
Click
Next
8.
Click
Next
9.
Enter
the serial number found on the base of the unit, for those units whose serial
numbers begin with V you will need to remove the VU5 from the front and the
letters at the end to locate the serial number. Enter the serial number in the
format SSG[DEVICE SERIAL]HA. So, if the device
serial number is VU521220099SA, the software serial will be SSG21220099HA. The
PID is always CST then click Next
10.
Ensure
English is selected and click Next
11.
Ensure
European Factory Setup is selected – if this step is missed you will need to
uninstall and start from the beginning again.
12.
Click
Install
13.
The
Virtual Com Port Driver is not needed – click OK
14.
Click
No to installing Adobe Reader
15.
Click
No to restarting the PC and click OK
16.
This
window will have opened automatically, you must close it before proceeding as
it will impact on software operation.
17.
If
the device is a CAM-USB (serial number begins 101…), please download https://downloads.numed.co.uk/Support/GECardioSoft/CAM-USB-V2-Driver-Set.zip extract and run setup.exe
18. Run SetPermissions_All v1.0.5.bat,
press any key once finished
19. Save the supplied option code – typically
named SWOPT – serial number.txt to C:\Numed\Intelligent
Integration Interface\SWOPT
Configuring the CardioSoft Software
20.
Plug
in the ECG machine to a spare USB port on the PC
21.
Go
to the desktop and open CardioSoft
22.
Click
System Configuration on the right-hand side.
23.
Go
to the Option Code tab (top of the window) and confirm the serial number is
visible.
24.
Click
Load
25.
Navigate
to where you’ve placed the supplied option codes text file, this file is
typically named SWOPT – serial number.txt and
click open.
26.
If
the Option codes are correct you should see a green tick against the imported
codes. Click OK
27.
Click
System Configuration
28.
Click
Resting ECG in Custom Setup
29.
Configure
the Acquisition tab as below
30.
Configure
the Final Report tab as below
31.
All
other tabs you can leave with defaults, once finished Click OK
32.
Click
on Export in Custom Setup
33.
Configure
setup as below, please note the PDF tick box will only be enabled if the device
is plugged in. Click OK when done
34.
Click
Printer in Custom Setup
35.
Configure
as below, click OK when done
36.
Click
OK and Quit Program
Configuring Intelligent Integration Interface
37. Launch the Intelligent Integration
Interface (I3) and click the settings cog in the top right-hand corner
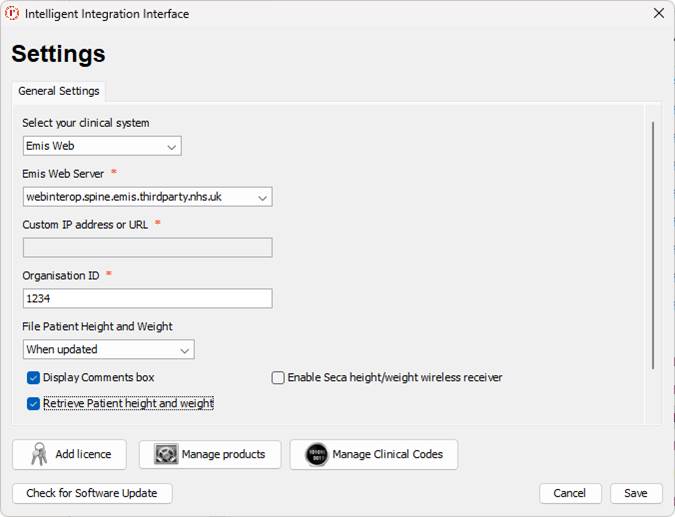
38. Configure correctly for the Clinical
System
TPP SystmOne
EMIS web
please note that the EMIS
Web Server is set for England in this example, please ensure that you select
the correct one for the region. The Organisation ID is the EMIS number (may be
known as CDB number) 
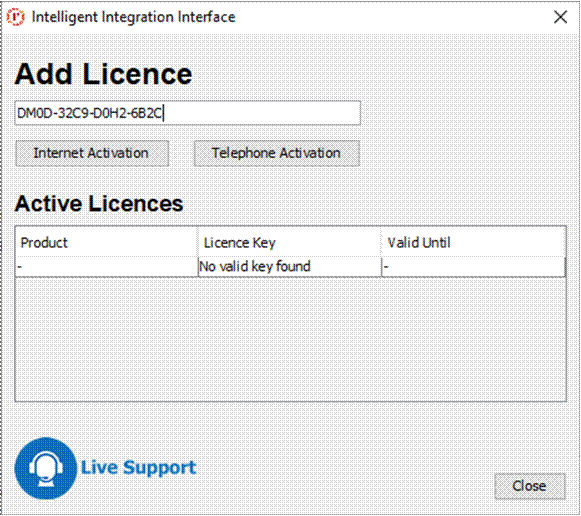
39. Click Add license
40. Enter the supplied license key from
Numed in the box and click Internet Activation, once added click Close – please
note that the license key in the image is a dummy and will not work image is a dummy and will not work 
41. Click Manage products
42. Ensure correct products are ticked then
click Save
43.
Click
ECG Settings and config the CardioSoft Settings as below, ensuring that the Choose
product serial number when using CardioSoft is ticked as well, then click Save
Your
software is now fully configured and ready for use if at any point you
experience any issues please call Numed support on 0114 399 0010 (option 3) or
use the live chat feature on our website https://www.numed.co.uk/support
For TPP
SystmOne customers please ensure that a user with high-level access runs the
software for the first time to approve the connection to SystmOne
For EMIS
web please ensure that the Intelligent Integration Interface Partner api has
been fully activated in the EMAS manager before first use.