Intelligent Integration Interface (I3) for MAC PDF Filer via SD Card Installation Guide
This guide will show you how to install and configure the Intelligent Integration Interface with SD Cards and MAC PDF Filer. If you need the license keys please request them by going to Numed Installation Guides and Request Licenses. You can download a PDF copy of this guide at the bottom of the page.

For the ECG file creation to work correctly all steps in this guide need to be followed.
Installation of Intelligent Integration Interface (I3)
1.
Download and extract https://downloads.numed.co.uk/software/i3/I3installer.zip
2. Run I3installer.msi then click Next
3. Click Install
4.
Click
Finish
5. Run SetPermissions_All v1.0.5.bat,
press any key once finished
Configuration of Intelligent Integration Interface (I3)
6. Insert the SD Card into the PC using
the supplied card reader.
7. Launch the Intelligent Integration
Interface (I3) and click the settings cog in the top right-hand corner
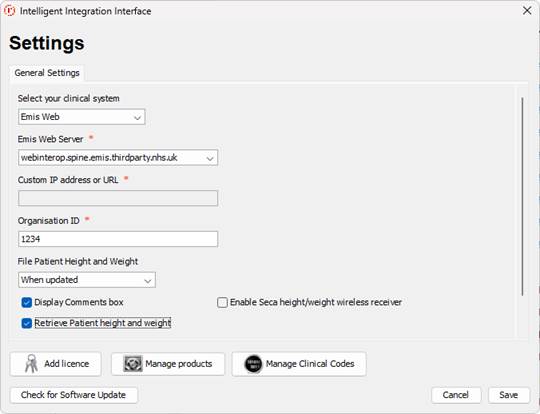
8. Configure correctly for the Clinical
System
TPP SystmOne
EMIS web
Please note that the EMIS
Web Server is set for England in this example, please ensure that you select
the correct one for the region. The Organisation ID is the EMIS number (may be
known as CDB number) 
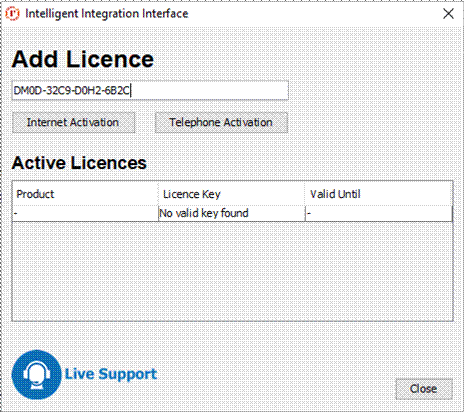
9. Click Add license
10. Enter the supplied license key from
Numed in the box and click Internet Activation, once added click Close – please
note that the license key in the image is a dummy and will not work
11. Click Manage products
12. Ensure correct products are ticked then
click Save
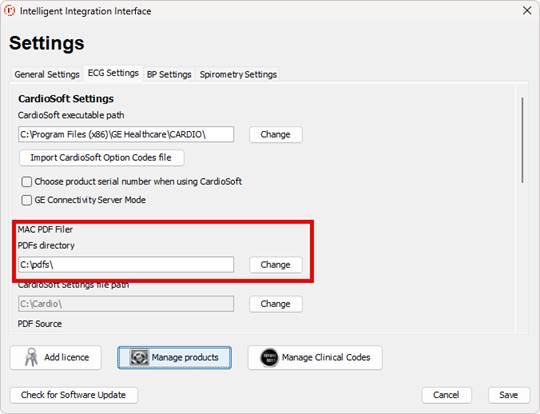
13. Click ECG Settings Tab and set the
PDFs directory (red box) to be the PDF folder on your SD card by clicking
change 
14.
Click
This PC
15.
Locate
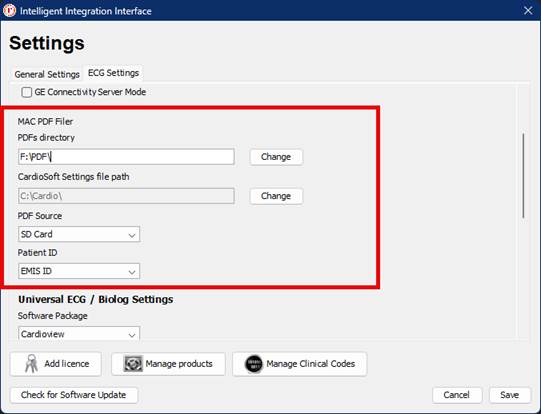
and double click the USB drive belonging to the SD card (F: in the example)
16. Select the PDF folder and click
choose
17.Ensure that PDF Source
is set to SD card and if applicable the Patient ID is set correctly, then click
Save and exit the settings. . 
Please note
that if the USB drive letter for the SD card changes on the PC it will need to
be changed within the I3 settings.
The Patient
ID setting is for EMIS web only, you can choose to either work with EMIS ID or
NHS\CHI numbers.
Your
software is now fully configured and ready for use. If your machine is brand
new, please go to How to activate store as PDF on the MAC600 to finish setting up your ECG machine.
For TPP
SystmOne customers,s please ensure that a user with high-level access runs the
software for the first time to approve the connection to SystmOne
For the EMIS
web, please ensure that the Intelligent Integration Interface Partner api has
been fully activated in the EMAS manager before the first use